---
title: Manage Testimonials on Discovery Site
description: "The purpose of testimonials and their importance in online courses, edX Studio provides a user-friendly way to add and edit testimonials to enhance your course’s credibility and engagement. Tip: Make"
---
[Skip to content](https://help.edly.io/docs/manage-testimonials-on-discovery-site-0#main-content)
English
Show submenu for translations
-1.png?width=100&height=75&name=Edly%20by%20Arbisoft%20(Red%20and%20Gray)-1.png)
Open main navigation
Close main navigation
- English
Show submenu for translations
- Visit edly.io
Visit edly.io
Hello. How can we help you?
- There are no suggestions because the search field is empty.
1. [Edly Knowledge Base](https://help.edly.io/docs?hsLang=en)
2. [Discovery Site](https://help.edly.io/docs/discovery-site?hsLang=en)
3. [Settings and Tools](https://help.edly.io/docs/discovery-site?hsLang=en#settings-and-tools)
# Manage Testimonials on Discovery Site
### Overview
Testimonials are an essential form of social proof that drive user validation and build registration trust with prospective students. By capturing and highlighting verified quotes, success stories, and rating metrics from past alumni, you can display these feedback loops across high-traffic zones—including your central homepage carousels or target course landing pages.
**Tip:** Ensure you have logged into your **WordPress Administration Panel (`/wp-admin`)** with proper Editor or Administrator permissions before proceeding.
### Step-by-Step Implementation
#### Step 1: Open the Testimonials Dashboard
1. Access your WordPress dashboard using your account credentials.
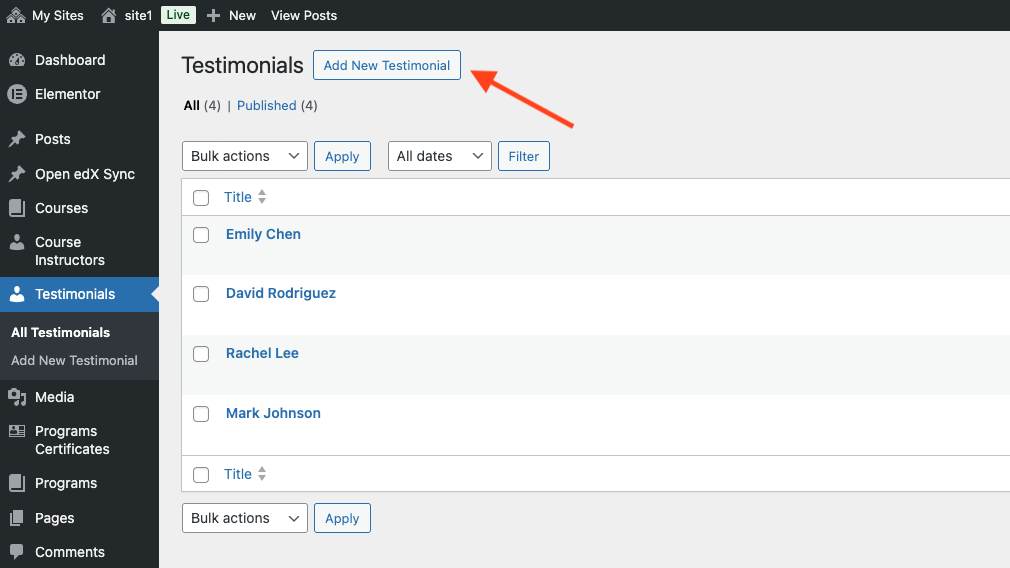
2. From the left-hand navigation sidebar menu, click on the **Testimonials** tab.
3. Click the **Add New Testimonial** button situated near the top of the index directory page.
> 
#### Step 2: Input Student Feedback Details
A structured text authoring layout canvas will open. Complete the following data fields:
- **Alumni Identifier (Title Field):** Type the student's full name or professional title into the primary header field (e.g., *Marcus Vance, Lead UX Designer*).
- **The Review Quote (Main Text Block):** Inside the central paragraph block area, paste or type the exact text snippet provided by the student highlighting their learning journey or professional success. Keep this description concise and punchy to optimize scannability.
#### Step 3: Attach an Alumni Profile Photo
Adding a high-quality photograph increases visual appeal and authenticity.
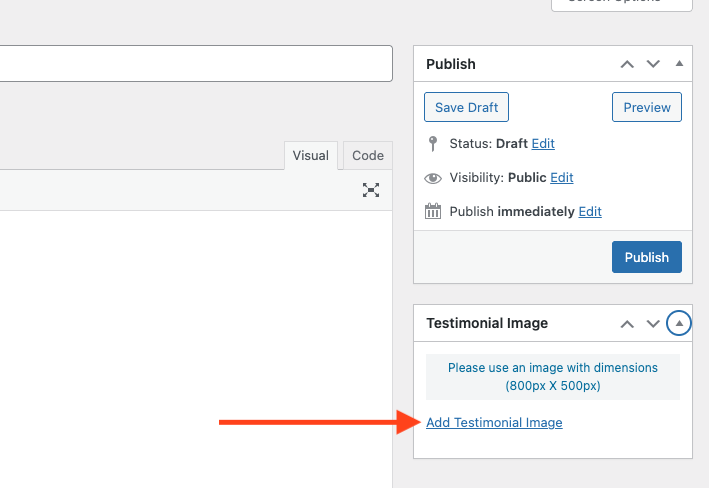
1. Locate the **Testimonial Image** options module block on the right-hand side of your screen panel.
2. Click **Add Testimonial Image**.
3. The central Media Library framework opens. Select an existing student profile thumbnail file from your system storage rows, or upload a new square orientation portrait graphic from your local machine.
4. **Accessibility Compliance:** Input a clear text string inside the **Alt Text** metadata input box (e.g., *Profile photo of student Marcus Vance*), ensuring compliance with standard web accessibility guidelines for screen readers.
5. Click **Set featured image** to bind the photo to the review row.
> 
#### Step 4: Finalize and Publish
1. Review your text rows for spelling, layout alignment, and rating accuracy.
2. Click the blue **Publish** button located in the upper-right corner of the workspace layout.
The database compiles the data instantly. The testimonial entry is now active and will automatically inject into your live storefront review sliders or course descriptive canvas rows based on your global theme layout rules.
### Auditing or Modifying Existing Reviews
#### How do I edit an active review card?
Navigate from your sidebar directory to **Testimonials \> All Testimonials**. Locate your target student's name row and click **Edit**. Implement your formatting corrections inside the text parameters or change the ranking value and click the blue **Update** button to sync changes live instantly.
#### How do I remove a testimonial from public display?
Go to your master testimonials list view, hover your mouse cursor over the target row entry, and click the red **Trash** link. This pulls the review down from your public marketing catalog blocks and safely shifts the file to an archive bin.
***Note**: Deleting or modifying an informational review tile inside the WordPress storefront changes front-end marketing visibility only. It operates entirely independently of the background learning management engines and will **not** alter any course completions data, student profile tracking, or grading ledger records inside your core LMS player.*
- [Discovery Site](https://help.edly.io/docs/discovery-site?hsLang=en#main-content)
- [Settings and Tools](https://help.edly.io/docs/discovery-site?hsLang=en#settings-and-tools)
- [Assets Management](https://help.edly.io/docs/discovery-site?hsLang=en#assets-management)
- [Edly Panel](https://help.edly.io/docs/edly-panel?hsLang=en#main-content)
- [Settings and Tools](https://help.edly.io/docs/edly-panel?hsLang=en#settings-and-tools)
- [User Management](https://help.edly.io/docs/edly-panel?hsLang=en#user-management)
- [Panel Insights](https://help.edly.io/docs/edly-panel?hsLang=en#panel-insights)
- [Panel Dashboard](https://help.edly.io/docs/edly-panel?hsLang=en#panel-dashboard)
- [Themes](https://help.edly.io/docs/edly-panel?hsLang=en#themes)
- [Studio](https://help.edly.io/docs/studio?hsLang=en#main-content)
- [Studio Guides](https://help.edly.io/docs/studio?hsLang=en#studio-guides)
- [Creating a Course](https://help.edly.io/docs/studio?hsLang=en#creating-a-course)
- [Exercises and Tools](https://help.edly.io/docs/studio?hsLang=en#exercises-and-tools)
- [Course Components](https://help.edly.io/docs/studio?hsLang=en#course-components)
- [Course Assets](https://help.edly.io/docs/studio?hsLang=en#course-assets)
- [Re-running Your Course](https://help.edly.io/docs/studio?hsLang=en#re-running-your-course)
- [LMS Administration](https://help.edly.io/docs/lms-administration?hsLang=en#main-content)
- [User Management](https://help.edly.io/docs/lms-administration?hsLang=en#user-management)
- [Open edX E-commerce](https://help.edly.io/docs/lms-administration?hsLang=en#open-edx-e-commerce)
- [Instructor Dashboard](https://help.edly.io/docs/lms-administration?hsLang=en#instructor-dashboard)
- [Learner Experience](https://help.edly.io/docs/learner-experience?hsLang=en#main-content)
- [Learning Management System](https://help.edly.io/docs/learner-experience?hsLang=en#learning-management-system)
- [Discovery Site](https://help.edly.io/docs/learner-experience?hsLang=en#discovery-site)
- [Getting Started](https://help.edly.io/docs/getting-started?hsLang=en#main-content)
- [Open edX E-commerce](https://help.edly.io/docs/getting-started?hsLang=en#open-edx-e-commerce)
- [Learning Management System](https://help.edly.io/docs/getting-started?hsLang=en#learning-management-system)
- [Exercises and Tools](https://help.edly.io/docs/getting-started?hsLang=en#exercises-and-tools)
- [Discovery Site](https://help.edly.io/docs/getting-started?hsLang=en#discovery-site)
- [Edly Panel Management](https://help.edly.io/docs/getting-started?hsLang=en#edly-panel-management)
- [General](https://help.edly.io/docs/general?hsLang=en)
[-2.png?width=34&height=24&name=Edly%20by%20Arbisoft%20(Red%20and%20Gray)-2.png "Chill listening crop-3")](http://arbisoft.com)
[mailto:email@email.com](mailto:email@email.com)
Copyright © 2026, Edly Inc.