---
title: How to Manage your Course Instructors on Discovery Site?
description: Tip: Make sure you have logged in to the Discovery Dashboard before proceeding with the article. You can view All Course Instructors in this section who are authorized to create courses You can also
---
[Skip to content](https://help.edly.io/docs/how-to-manage-your-course-instructors-on-discovery-site-0#main-content)
English
Show submenu for translations
-1.png?width=100&height=75&name=Edly%20by%20Arbisoft%20(Red%20and%20Gray)-1.png)
Open main navigation
Close main navigation
- English
Show submenu for translations
- Visit edly.io
Visit edly.io
Hello. How can we help you?
- There are no suggestions because the search field is empty.
1. [Edly Knowledge Base](https://help.edly.io/docs?hsLang=en)
2. [Discovery Site](https://help.edly.io/docs/discovery-site?hsLang=en)
3. [Settings and Tools](https://help.edly.io/docs/discovery-site?hsLang=en#settings-and-tools)
# How to Manage your Course Instructors on Discovery Site?
### Overview
Once you have created standalone faculty profiles under your central directory, you can assign, reorder, or replace instructors across various course runs. Properly managing these profile mappings allows you to maintain an accurate public catalog as teaching assignments change from semester to semester, without altering your core LMS grading databases.
**Tip:** Ensure you have logged in to your **WordPress Administration Panel (`/wp-admin`)** with proper Editor or Administrator permissions before proceeding.
### Step-by-Step Implementation
#### Step 1: Locate Your Target Course Entry
1. Access your WordPress dashboard using your login credentials.
2. From the left-hand navigation sidebar menu, click on the **Courses** tab.
3. Scroll through your product catalog directory list to locate the specific course run you want to update.
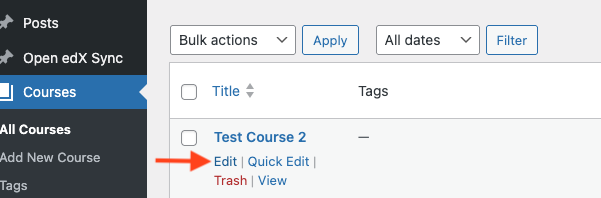
4. Click on the course title link, or hover your cursor over the row and click **Edit** to open the main page authoring canvas.
> 
#### Step 2: Map Instructors in the Configuration Panel
1. Inside the course editing workspace, look directly at the options sidebar panel located on the right-hand side of your screen.
2. Scroll down through the meta-configuration blocks until you find the **Instructors** or **Course Authors** checkbox section.
3. **Assign Faculty:** Check the boxes next to the names of the pre-registered instructors who are actively leading this specific course semester run.
4. **Remove Faculty:** Uncheck the boxes next to any historical or transitioning staff members to cleanly sever their display connection from this page footprint.
#### Step 3: Configure Primary Display Order (Optional)
If your course layout template features a multi-instructor arrangement and you want to designate a primary lead educator:
1. Scroll down beneath the main paragraph body editor box to find the **Product Metadata / Custom Fields** options panel.
2. Locate the specialized instructor array layout row.
3. Drag, drop, or numerically arrange the assigned names to control their left-to-right presentation priority on your live storefront grid (positioning a name at index `1` forces their bio card to display first).
#### Step 4: Push Configuration Revisions Live
1. Click the **Preview** button in the upper-right menu toolbar to verify how the biography summaries and headshot thumbnail images align on the course page layout.
2. Once satisfied with the visual arrangement, click the blue **Update** button at the top right of the canvas to compile your database modifications.
### Important Operational Best Practices
- **The Pre-Registration Rule:** The course editing canvas will only display names that have been formally built out ahead of time. If a new guest educator joins your team, you must first navigate to **Instructors \> Add New Instructor** to compile their profile details and featured image before they will appear as a selectable choice inside your course mapping sidebars.
- **Data Privacy Boundaries:** Managing, unlinking, or shifting instructor profile boxes inside the WordPress marketing storefront changes only **front-end catalog visibility**. It operates entirely independently of the background data streams. It will **not** alter your behind-the-scenes instructor grading privileges, course author permissions inside **Open edX Studio**, or student roster tracking records inside your core LMS player.
- [Discovery Site](https://help.edly.io/docs/discovery-site?hsLang=en#main-content)
- [Settings and Tools](https://help.edly.io/docs/discovery-site?hsLang=en#settings-and-tools)
- [Assets Management](https://help.edly.io/docs/discovery-site?hsLang=en#assets-management)
- [Edly Panel](https://help.edly.io/docs/edly-panel?hsLang=en#main-content)
- [Settings and Tools](https://help.edly.io/docs/edly-panel?hsLang=en#settings-and-tools)
- [User Management](https://help.edly.io/docs/edly-panel?hsLang=en#user-management)
- [Panel Insights](https://help.edly.io/docs/edly-panel?hsLang=en#panel-insights)
- [Panel Dashboard](https://help.edly.io/docs/edly-panel?hsLang=en#panel-dashboard)
- [Themes](https://help.edly.io/docs/edly-panel?hsLang=en#themes)
- [Studio](https://help.edly.io/docs/studio?hsLang=en#main-content)
- [Studio Guides](https://help.edly.io/docs/studio?hsLang=en#studio-guides)
- [Creating a Course](https://help.edly.io/docs/studio?hsLang=en#creating-a-course)
- [Exercises and Tools](https://help.edly.io/docs/studio?hsLang=en#exercises-and-tools)
- [Course Components](https://help.edly.io/docs/studio?hsLang=en#course-components)
- [Course Assets](https://help.edly.io/docs/studio?hsLang=en#course-assets)
- [Re-running Your Course](https://help.edly.io/docs/studio?hsLang=en#re-running-your-course)
- [LMS Administration](https://help.edly.io/docs/lms-administration?hsLang=en#main-content)
- [User Management](https://help.edly.io/docs/lms-administration?hsLang=en#user-management)
- [Open edX E-commerce](https://help.edly.io/docs/lms-administration?hsLang=en#open-edx-e-commerce)
- [Instructor Dashboard](https://help.edly.io/docs/lms-administration?hsLang=en#instructor-dashboard)
- [Learner Experience](https://help.edly.io/docs/learner-experience?hsLang=en#main-content)
- [Learning Management System](https://help.edly.io/docs/learner-experience?hsLang=en#learning-management-system)
- [Discovery Site](https://help.edly.io/docs/learner-experience?hsLang=en#discovery-site)
- [Getting Started](https://help.edly.io/docs/getting-started?hsLang=en#main-content)
- [Open edX E-commerce](https://help.edly.io/docs/getting-started?hsLang=en#open-edx-e-commerce)
- [Learning Management System](https://help.edly.io/docs/getting-started?hsLang=en#learning-management-system)
- [Exercises and Tools](https://help.edly.io/docs/getting-started?hsLang=en#exercises-and-tools)
- [Discovery Site](https://help.edly.io/docs/getting-started?hsLang=en#discovery-site)
- [Edly Panel Management](https://help.edly.io/docs/getting-started?hsLang=en#edly-panel-management)
- [General](https://help.edly.io/docs/general?hsLang=en)
[-2.png?width=34&height=24&name=Edly%20by%20Arbisoft%20(Red%20and%20Gray)-2.png "Chill listening crop-3")](http://arbisoft.com)
[mailto:email@email.com](mailto:email@email.com)
Copyright © 2026, Edly Inc.