-1.png?width=100&height=75&name=Edly%20by%20Arbisoft%20(Red%20and%20Gray)-1.png)
Overview
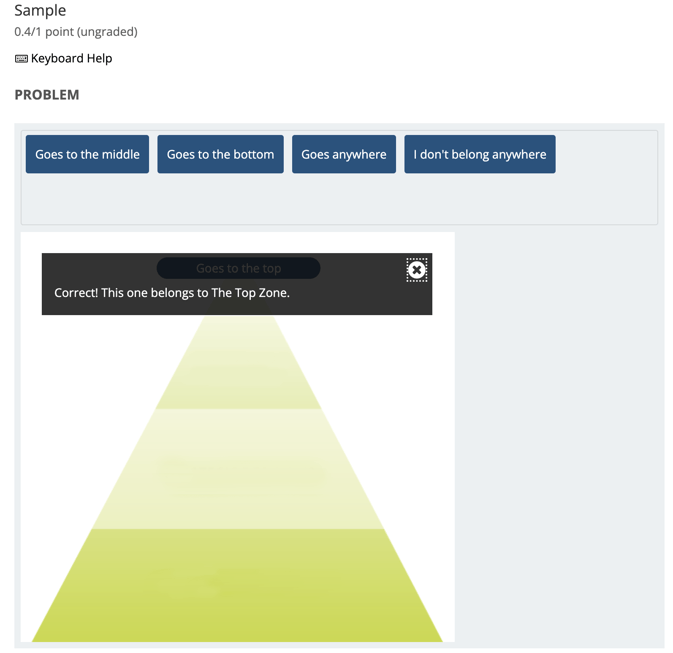
A drag and drop problem includes a background image and one or more items that learners can drag into target zones on the background image. You can include as many draggable items and as many target zones as you need. You can include decoy items that do not have a target, and you can include decoy targets that do not correspond to draggable items.
Tip: Make sure you have logged into the Open edX Studio before proceeding with the article.
Adding & Editing Drag and Drop
To create a drag and drop problem, follow these steps.
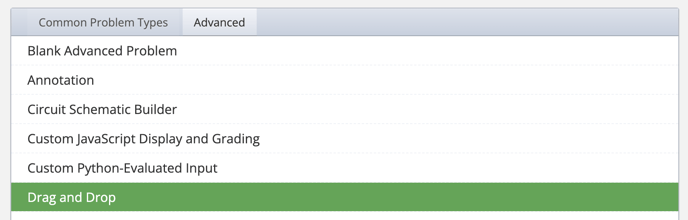
- In the unit where you want to create the problem, under Problem select Advanced.
- From the list of advanced components, select Drag & Drop. The studio will add the drag and drop problem to the unit.
- Select Edit. The editing dialog box opens.
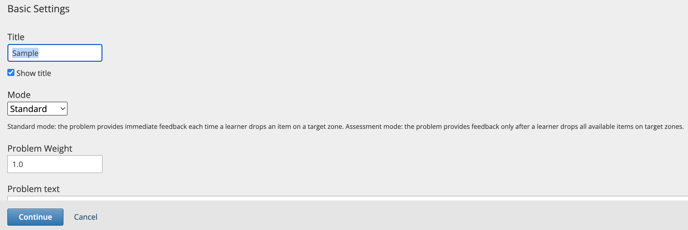
Basic Settings
- Please fill in the Problem title (The heading that will appear above the drag and drop problem)
- Next, please select the mode.
-
- Standard mode configures a drag and drop problem to give learners unlimited attempts to match draggable items with target zones until all of the items are matched to the correct targets. Each time a learner drops an item on a target zone, the problem reports whether the match is correct. If the match is not correct, the draggable item is returned to the item bank for a new attempt. A learner completes a drag and drop problem in standard mode when all of the items are matched to target zones correctly. Learners receive the maximum score for the problem when the problem is complete.
- Assessment mode configures a drag and drop problem to behave like a test. In assessment mode, learners must match all of the draggable items to target zones before the problem reveals whether the items are matched correctly. Learners select Submit when they believe that they have completed the problem. If all items are matched correctly, the problem is complete. If any items are not matched correctly, and the maximum number of attempts has not been reached, the learner can correct items and select Submit again. When the learner reaches the maximum number of attempts, the problem is complete.
Note: The score for the problem is calculated by dividing the maximum score based on the percent of draggable items that are matched correctly. If a learner attempts the problem multiple times, the score for the best attempt is the final score for the problem.
-
-
- In assessment mode, you can specify the number of times that learners can submit a drag and drop problem. If you allow more than one attempt, the problem reveals which items are correctly matched and gives learners an opportunity to move items that are not correct. If you do not specify a limit, learners have unlimited attempts.
-
- Then, assign Problem Weight. (The total number of points that learners receive for completing the problem.)
- Next, please add the Problem text (Text that appears above the problem in the LMS. You can use this text to provide instructions or explain the problem.)
- Add the Introductory Feedback. (The text that appears in the feedback section of the problem before a learner begins.)
- Add the Final Feedback. (The text that appears in the feedback section of the problem after a learner matches all items to their target zones.)
- Then press Continue.
Setting Zones
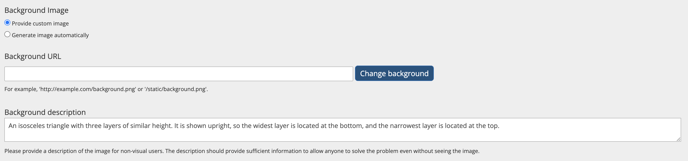
Select background image:- Generate Image Automatically
- You can mention the Zone Layout and Zone size dimensions and press Generate image to create a random background image.
- Add the background URL ( The URL where the image is stored)
- Add Background Image Description (A description of the background image. This description is used by learners who cannot access the visual image.)
- The next, step is to define the zone. A target zone is a rectangular area on the background image. You can show or hide the borders of a zone for learners. You can add titles for zones or leave the Title field empty.You can create multiple zones on the background image. For each zone, you need to define:
- Once you have finalized the details for each zone, press Continue.

Set Items
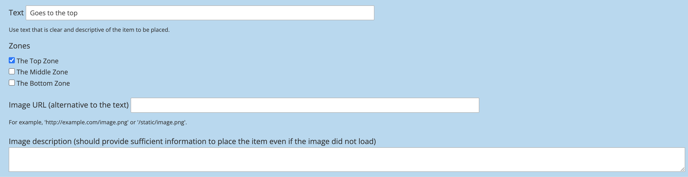
- Finally, you need to define the number of draggable items and their details. The following details need to be set:
- Item Text Controls the text that appears on the draggable item in the problem.
- Item Zones Controls the target zones that match the draggable item. Learners must drag the item to any one of the target zones that you select.
- Item Image URL (Optional) the URL of an image that appears on a draggable item. The image appears on the draggable item in the problem.
- Item Image description Text that describes the image label for a draggable item. The description is used by learners who cannot access the visual image label.
- Item Success Feedback The text message that appears above the background image when a learner places a draggable item on its matching target zone.
- Item Error Feedback The text message that appears above the background image when a learner places a draggable item on an incorrect matching target zone.
- Item Show advanced settings Opens additional controls for configuring a draggable item.
- Item Preferred width The horizontal size of a draggable item as a percent of the problem width. The percent value must be a whole number between 0 and 100.
- Add an item Adds a set of controls for a new draggable item to the Editing dialog box.
- Last, press the Save button to create the Drag & Drop xblock.