---
title: How to Create Courses Programs?
description: "Tip: First enable a certificate and add courses to the Open edX E-commerce site by following this article How to Add Courses in E-commerce and Mark Them Paid before proceeding further. Note: You may"
---
[Skip to content](https://help.edly.io/docs/how-to-create-courses-programs-0#main-content)
English
Show submenu for translations
-1.png?width=100&height=75&name=Edly%20by%20Arbisoft%20(Red%20and%20Gray)-1.png)
Open main navigation
Close main navigation
- English
Show submenu for translations
- Visit edly.io
Visit edly.io
Hello. How can we help you?
- There are no suggestions because the search field is empty.
1. [Edly Knowledge Base](https://help.edly.io/docs?hsLang=en)
2. [Discovery Site](https://help.edly.io/docs/discovery-site?hsLang=en)
3. [Settings and Tools](https://help.edly.io/docs/discovery-site?hsLang=en#settings-and-tools)
# How to Create Courses Programs?
### Overview
A Program allows you to group a series of related courses together into a specialized academic track, credential bundle, or certification pathway (e.g., a *Data Science Professional Certification* composed of 4 individual courses). This system simplifies cross-course progression and automates master certification delivery when all component elements are cleared by a student profile.
**Tip:** Before continuing, ensure your individual course components are fully published in Studio, configured in E-commerce (and marked paid if applicable), and formally imported into your WordPress storefront catalog.
### Step 1: Create the Program Container
With your isolated core courses pre-indexed, you can combine them into a unified track.
**Procedures:**
1. Log in to your WordPress-powered **Discovery Site Administration Panel (`/wp-admin`)**.
2. From the left-hand navigation sidebar menu layout, click on the **Programs** tab.
3. Click the **Add New Program** button situated at the top of the interface.
4. Fill out the comprehensive program configuration properties fields:
- **Program Title:** Input the official public name for the full certification track.
- **Program Description:** Write a marketing outline, clear learning objectives, and enrollment criteria for the bundle.
- **Associated Courses:** Use the search-and-select multiselect box to add the individual course components that comprise this program sequence.
5. Click the blue **Publish** button located in the upper-right configuration sidebar.
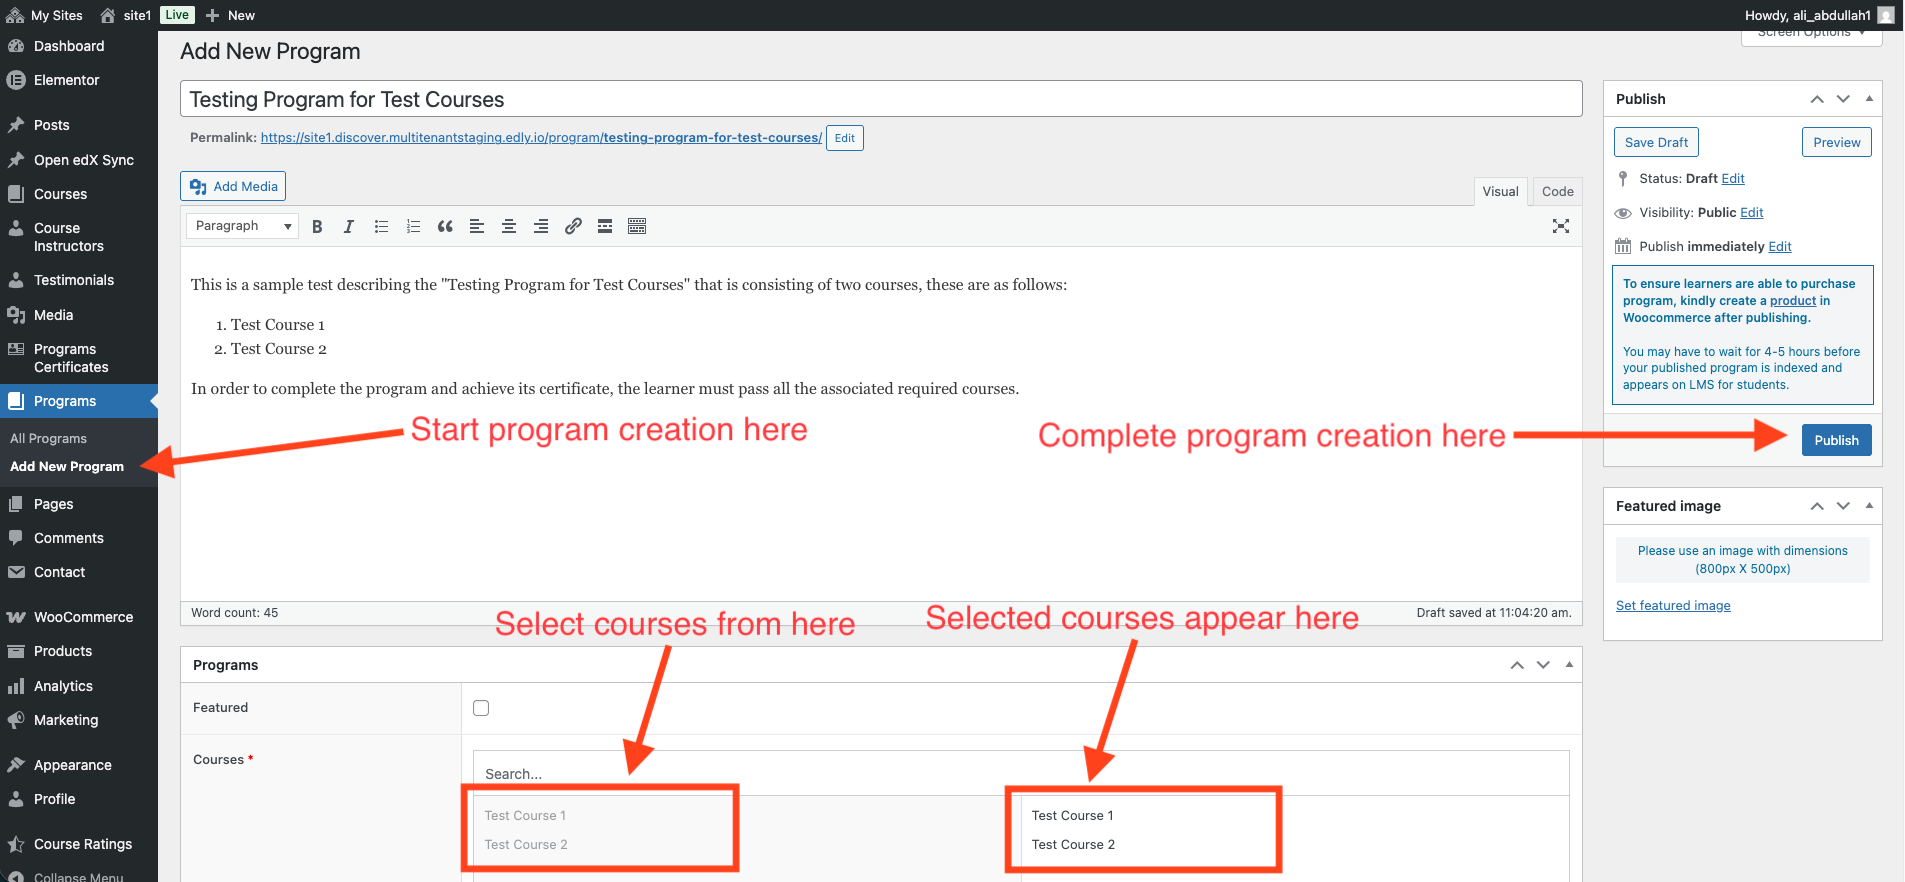
***Note**: Because the data must map across system indices, it can take **15–30 minutes** for the newly published program tracking keys to finish background database indexing and render on the live student LMS.*
### Step 2: Establish the Program Certificate Lifecycle
Once the structural course bundle layout is published, you must build out the corresponding milestone graduation credential template.
**Procedures:**
1. From your dashboard navigation sidebar, click on the **Programs Certificate** tab.
2. Click the **Add New Program Certificate** button.
3. **Link to Track:** Locate the program lookup search field, type your track's name, and select the Program container you generated during Step 1.
4. **Configure Signatories:** Input the names, institutional titles, and digital signatures of your designated academic sign-off authorities (e.g., *Dean of Engineering*, *Lead Content Director*). This binds official verification credentials to the digital document canvas.
5. Click the blue **Publish** button.
***Note**: Just like the program container, background processing require **15–30 minutes** for the program certificate data rows to update server-wide.*
### Learner Perspective and Certificate Delivery
When an enrolled student finishes the final assignment milestone of the last remaining course run inside the program bundle, the background verification engine triggers an automatic status audit. The moment it confirms that passing credentials exist for every course linked inside your Program mapping block, the platform instantly compiles your signatories data and releases the master Program Certificate directly to the learner's personal profile dashboard.
- [Discovery Site](https://help.edly.io/docs/discovery-site?hsLang=en#main-content)
- [Settings and Tools](https://help.edly.io/docs/discovery-site?hsLang=en#settings-and-tools)
- [Assets Management](https://help.edly.io/docs/discovery-site?hsLang=en#assets-management)
- [Edly Panel](https://help.edly.io/docs/edly-panel?hsLang=en#main-content)
- [Settings and Tools](https://help.edly.io/docs/edly-panel?hsLang=en#settings-and-tools)
- [User Management](https://help.edly.io/docs/edly-panel?hsLang=en#user-management)
- [Panel Insights](https://help.edly.io/docs/edly-panel?hsLang=en#panel-insights)
- [Panel Dashboard](https://help.edly.io/docs/edly-panel?hsLang=en#panel-dashboard)
- [Themes](https://help.edly.io/docs/edly-panel?hsLang=en#themes)
- [Studio](https://help.edly.io/docs/studio?hsLang=en#main-content)
- [Studio Guides](https://help.edly.io/docs/studio?hsLang=en#studio-guides)
- [Creating a Course](https://help.edly.io/docs/studio?hsLang=en#creating-a-course)
- [Exercises and Tools](https://help.edly.io/docs/studio?hsLang=en#exercises-and-tools)
- [Course Components](https://help.edly.io/docs/studio?hsLang=en#course-components)
- [Course Assets](https://help.edly.io/docs/studio?hsLang=en#course-assets)
- [Re-running Your Course](https://help.edly.io/docs/studio?hsLang=en#re-running-your-course)
- [LMS Administration](https://help.edly.io/docs/lms-administration?hsLang=en#main-content)
- [User Management](https://help.edly.io/docs/lms-administration?hsLang=en#user-management)
- [Open edX E-commerce](https://help.edly.io/docs/lms-administration?hsLang=en#open-edx-e-commerce)
- [Instructor Dashboard](https://help.edly.io/docs/lms-administration?hsLang=en#instructor-dashboard)
- [Learner Experience](https://help.edly.io/docs/learner-experience?hsLang=en#main-content)
- [Learning Management System](https://help.edly.io/docs/learner-experience?hsLang=en#learning-management-system)
- [Discovery Site](https://help.edly.io/docs/learner-experience?hsLang=en#discovery-site)
- [Getting Started](https://help.edly.io/docs/getting-started?hsLang=en#main-content)
- [Open edX E-commerce](https://help.edly.io/docs/getting-started?hsLang=en#open-edx-e-commerce)
- [Learning Management System](https://help.edly.io/docs/getting-started?hsLang=en#learning-management-system)
- [Exercises and Tools](https://help.edly.io/docs/getting-started?hsLang=en#exercises-and-tools)
- [Discovery Site](https://help.edly.io/docs/getting-started?hsLang=en#discovery-site)
- [Edly Panel Management](https://help.edly.io/docs/getting-started?hsLang=en#edly-panel-management)
- [General](https://help.edly.io/docs/general?hsLang=en)
[-2.png?width=34&height=24&name=Edly%20by%20Arbisoft%20(Red%20and%20Gray)-2.png "Chill listening crop-3")](http://arbisoft.com)
[mailto:email@email.com](mailto:email@email.com)
Copyright © 2026, Edly Inc.