---
title: How to Add Social Media Links to Your WordPress Website?
description: Adding social media links to your WordPress website is a great way to connect with your audience and increase your online presence. In this guide, we'll walk you through the simple steps to seamlessly
---
[Skip to content](https://help.edly.io/docs/how-to-add-social-media-links-to-your-wordpress-website-0#main-content)
English
Show submenu for translations
-1.png?width=100&height=75&name=Edly%20by%20Arbisoft%20(Red%20and%20Gray)-1.png)
Open main navigation
Close main navigation
- English
Show submenu for translations
- Visit edly.io
Visit edly.io
Hello. How can we help you?
- There are no suggestions because the search field is empty.
1. [Edly Knowledge Base](https://help.edly.io/docs?hsLang=en)
2. [Discovery Site](https://help.edly.io/docs/discovery-site?hsLang=en)
# How to Add Social Media Links to Your WordPress Website?
### Overview
Adding social media links to your discovery platform helps prospective and current students find your official channels (such as LinkedIn, Facebook, X, or YouTube). You can drop these hyperlinks seamlessly onto any target marketing canvas—including your central homepage, your primary site footer, or a designated "Contact Us" layout zone.
**Tip:** Ensure you are logged into the **WordPress Administration Panel (`/wp-admin`)** and have gathered the complete, absolute URLs of your respective social profiles before proceeding.
### Step-by-Step Implementation
#### Step 1: Open Your Target Page in the Editor
1. Access your WordPress dashboard using your administrator or editor credentials.
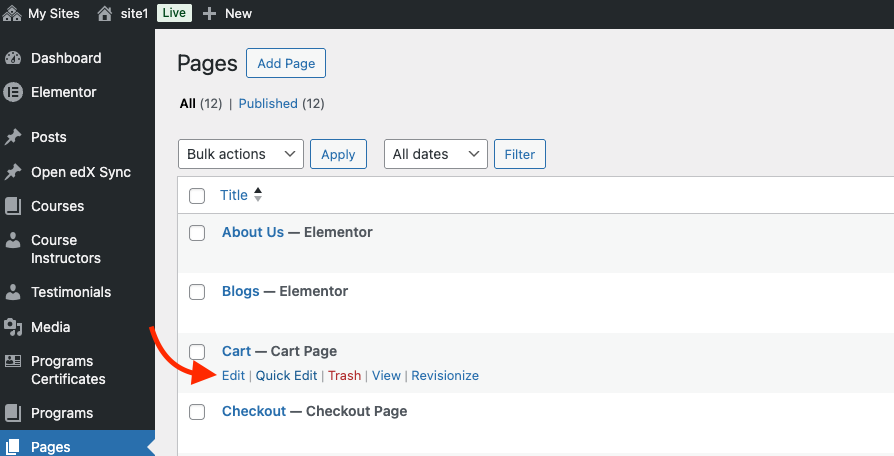
2. From the left-hand navigation sidebar, go to **Pages \> All Pages**.
3. Scroll through your structural directory list to find the layout canvas you want to update (e.g., *Homepage*, *About Us*, or *Contact Us*).
4. Click the page title or click **Edit** to launch the content workspace.
> 
#### Step 2: Insert the Social Text Prompt
1. Inside the text block editor, position your mouse cursor exactly where you want the connection links to display.
2. Type a clear, action-oriented text prompt to guide your visitors (e.g., *Connect with us on social media:* or *Follow our academic network:*).
#### Step 3: Map and Link Your Profile URLs
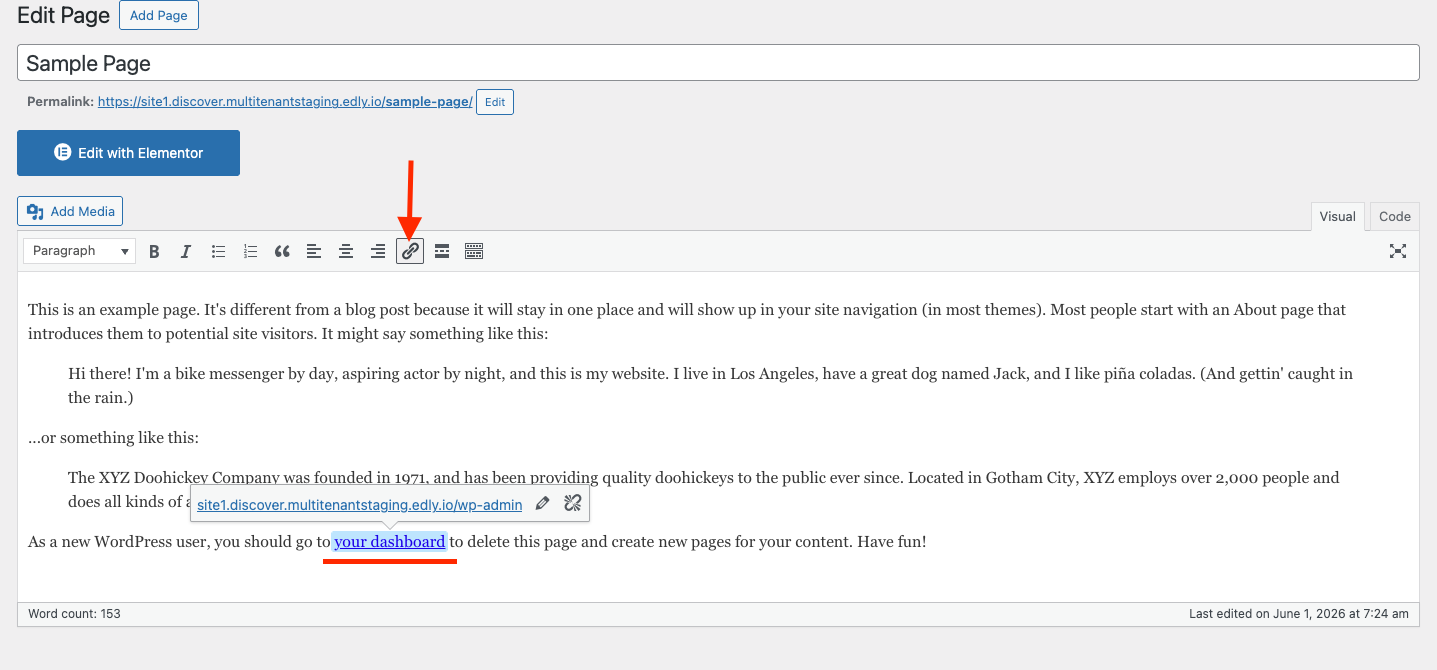
1. Using your mouse cursor, click and highlight the specific word or phrase you want to convert into a clickable link (e.g., highlight the word **`Facebook`** or **`LinkedIn`**).
2. Look directly at the floating editor formatting toolbar above your paragraph and click the **Insert/edit link** icon (represented visually by a interlocking metal chain link symbol).
3. A configuration pop-up bubble will appear. Paste the absolute web address of your official profile directly into the **URL** input field.
- *Example absolute structure:* `[https://www.linkedin.com/company/your-institution-slug](https://www.linkedin.com/company/your-institution-slug)`
4. **Accessibility & Hover Context (Optional):** Click the advanced settings gear icon within the pop-up link window to add a semantic **Link Title** attributes line (e.g., *Follow us on LinkedIn*). This provides clear context for screen-readers and displays a tool-tip label when a user hovers their mouse over the link.
5. Click the apply icon (or press `Enter`) to lock the link onto the text anchor.
> 
#### Step 4: Preview and Push Changes Live
1. Review your paragraph block to confirm that the selected text anchors display the proper hyperlink underlines and accent styling colors.
2. Click the **Preview** button in the top-right toolbar panel to review the presentation layout from a student's perspective.
3. Once satisfied with the layout and formatting, click the blue **Update** (or *Publish*) button to compile your modifications and push the live links to your storefront server.
### Alternative Method: Using Global Customizer Menus
If your platform uses an active social icon menu widget inside your global layout headers or footers, you can configure your links globally across the entire site instead of manual page-by-page editing:
1. Navigate from your sidebar to **Appearance \> Customize**.
2. Expand the **Menus** or **Header/Footer Builder** panel settings block.
3. Locate the **Social Media Links** or **Social Icons** custom menu sub-tab.
4. Input your specific profile URLs next to their corresponding brand icons.
5. Click **Publish** at the top of the Customizer column to update every page footprint instantly.
- [Discovery Site](https://help.edly.io/docs/discovery-site?hsLang=en#main-content)
- [Settings and Tools](https://help.edly.io/docs/discovery-site?hsLang=en#settings-and-tools)
- [Assets Management](https://help.edly.io/docs/discovery-site?hsLang=en#assets-management)
- [Edly Panel](https://help.edly.io/docs/edly-panel?hsLang=en#main-content)
- [Settings and Tools](https://help.edly.io/docs/edly-panel?hsLang=en#settings-and-tools)
- [User Management](https://help.edly.io/docs/edly-panel?hsLang=en#user-management)
- [Panel Insights](https://help.edly.io/docs/edly-panel?hsLang=en#panel-insights)
- [Panel Dashboard](https://help.edly.io/docs/edly-panel?hsLang=en#panel-dashboard)
- [Themes](https://help.edly.io/docs/edly-panel?hsLang=en#themes)
- [Studio](https://help.edly.io/docs/studio?hsLang=en#main-content)
- [Studio Guides](https://help.edly.io/docs/studio?hsLang=en#studio-guides)
- [Creating a Course](https://help.edly.io/docs/studio?hsLang=en#creating-a-course)
- [Exercises and Tools](https://help.edly.io/docs/studio?hsLang=en#exercises-and-tools)
- [Course Components](https://help.edly.io/docs/studio?hsLang=en#course-components)
- [Course Assets](https://help.edly.io/docs/studio?hsLang=en#course-assets)
- [Re-running Your Course](https://help.edly.io/docs/studio?hsLang=en#re-running-your-course)
- [LMS Administration](https://help.edly.io/docs/lms-administration?hsLang=en#main-content)
- [User Management](https://help.edly.io/docs/lms-administration?hsLang=en#user-management)
- [Open edX E-commerce](https://help.edly.io/docs/lms-administration?hsLang=en#open-edx-e-commerce)
- [Instructor Dashboard](https://help.edly.io/docs/lms-administration?hsLang=en#instructor-dashboard)
- [Learner Experience](https://help.edly.io/docs/learner-experience?hsLang=en#main-content)
- [Learning Management System](https://help.edly.io/docs/learner-experience?hsLang=en#learning-management-system)
- [Discovery Site](https://help.edly.io/docs/learner-experience?hsLang=en#discovery-site)
- [Getting Started](https://help.edly.io/docs/getting-started?hsLang=en#main-content)
- [Open edX E-commerce](https://help.edly.io/docs/getting-started?hsLang=en#open-edx-e-commerce)
- [Learning Management System](https://help.edly.io/docs/getting-started?hsLang=en#learning-management-system)
- [Exercises and Tools](https://help.edly.io/docs/getting-started?hsLang=en#exercises-and-tools)
- [Discovery Site](https://help.edly.io/docs/getting-started?hsLang=en#discovery-site)
- [Edly Panel Management](https://help.edly.io/docs/getting-started?hsLang=en#edly-panel-management)
- [General](https://help.edly.io/docs/general?hsLang=en)
[-2.png?width=34&height=24&name=Edly%20by%20Arbisoft%20(Red%20and%20Gray)-2.png "Chill listening crop-3")](http://arbisoft.com)
[mailto:email@email.com](mailto:email@email.com)
Copyright © 2026, Edly Inc.