-1.png?width=100&height=75&name=Edly%20by%20Arbisoft%20(Red%20and%20Gray)-1.png)
Overview
This guide explains how to integrate Microsoft OneNote into an Open edX course using LTI (Learning Tools Interoperability). Once configured, instructors can embed shared class notebooks, collaborative workspaces, and personal student journals directly inside any course unit. This integration uses standard LTI communication protocols to securely link your platform with Microsoft’s educational tools.
The steps below describe the LTI 1.1 integration method, which uses per-course LTI Passports configured in Advanced Settings. This method remains fully supported in current Open edX releases. However, newer Open edX releases also include a centralized Reusable LTI Store that supports the newer LTI 1.3 (LTI Advantage) standard. If your organization has configured the Reusable LTI Store, you may be able to set up OneNote as an LTI 1.3 tool at the platform level, eliminating the need for per-course passport configuration. Contact your site administrator to determine which method is recommended for your deployment.
Tip: Ensure you are logged into Open edX Studio with appropriate Admin or Staff permissions before proceeding.
Prerequisites
Before you begin, confirm that you have:
- An active Microsoft 365 Education account (Teacher or Administrator role) with OneNote access enabled for your institution
- Admin or Staff permissions in Open edX Studio for the course you want to configure
- Access to Advanced Settings in Studio (confirm with your site administrator if unsure)
Step 1: Generate OneNote LTI credentials
Before configuring settings in Studio, you must register your course instance with Microsoft to obtain secure access keys.
- Navigate to the official Microsoft LTI Registration Portal (e.g.,
onenote.com/lti). - Log in with your institution's Microsoft 365 Teacher or Admin account credentials.
- Select Register a new LMS/Platform and follow the onboarding prompts.
- Name your registration profile clearly (e.g.,
Edly_LMS_OneNote). - Copy the generated Consumer Key, Shared Secret, and Launch URL displayed on the final success screen. Keep this window open for reference.
Step 2: Configure the LTI Passport in Studio
To establish a verified trust relationship between your platform database and Microsoft's content servers, you must save your credentials inside your course policy settings.
- Open your course run in Studio.
- From the Settings menu in the top navigation bar, select Advanced Settings.
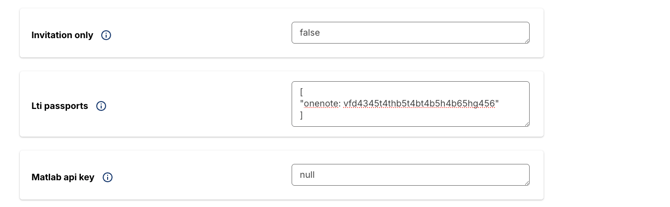
- Locate or search for the LTI Passports field.
- Add your credential details inside the array brackets using this strict syntax format:
["onenote:CONSUMER_KEY:SHARED_SECRET"]- Note: Replace
CONSUMER_KEYandSHARED_SECRETwith the exact alphanumeric strings generated in Step 1. Retain theonenote:prefix identifier exactly as shown.
- Note: Replace
- Click Save Changes at the bottom of the screen.
Step 3: Enable the LTI Consumer Module
Next, you must verify that the LTI building tool is active within your current course run template.
- While still inside Advanced Settings, look for the Advanced Module List field.
- Inside the square brackets
[ ], verify or add the key string exactly as:"lti_consumer"- Note: Ensure you use standard straight double quotation marks (
"). Using smart curly quotes or missing commas between multiple blocks will result in a validation error.
- Note: Ensure you use standard straight double quotation marks (
- Click Save Changes.
Step 4: Embed the OneNote Component into a Unit
With your background keys saved, you can drop the live workbook portal onto any target learning page.
- Navigate to your Course Outline and open the specific Unit where you want the workbook to reside.
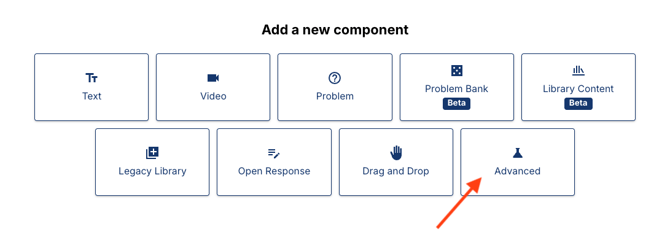
- Scroll to the Add New Component selection bar at the bottom of the unit workspace.
- Click the Advanced tile.
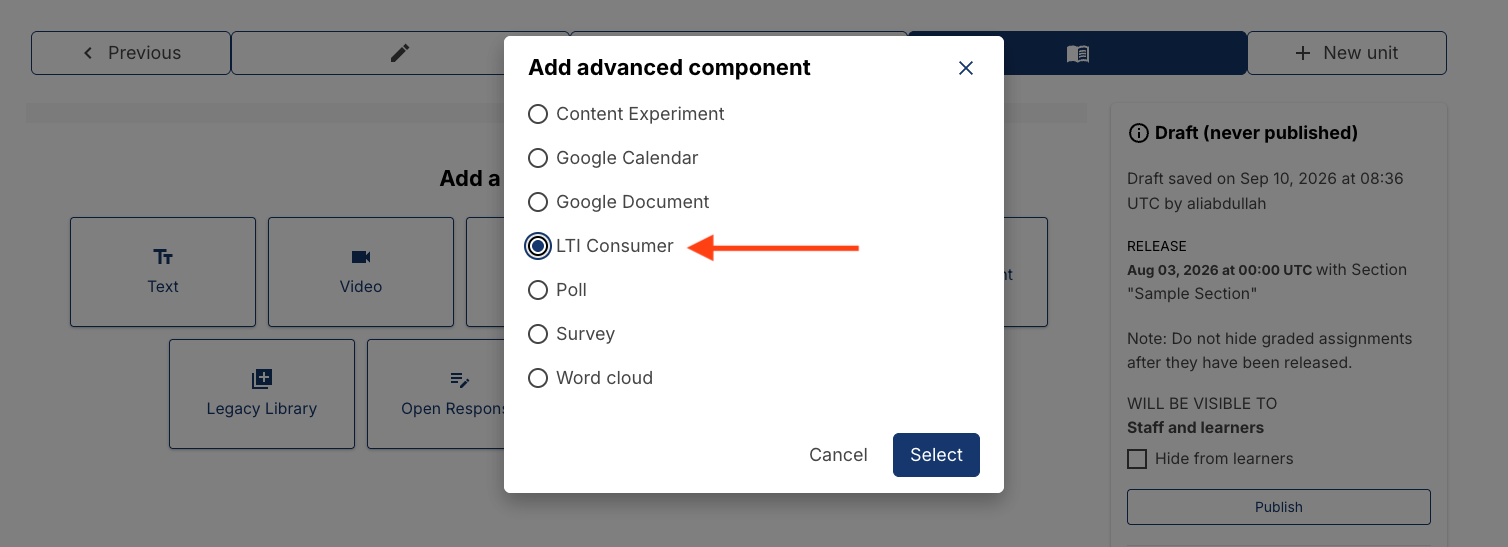
- Click LTI Consumer. The interface container block will immediately load onto your unit layout page canvas.
Step 5: Configure the LTI Consumer Tool Settings
You must configure the individual block instance to call your explicit Microsoft notebook module.
- Find the newly deployed LTI Consumer block on your unit canvas and click Edit.
- Enter the following parameters in the configuration window:
- Display Name: Enter a learner-facing title (e.g., Collaborative Workspace: Class OneNote Notebook).
- LTI ID: Type exactly:
onenote(This matches the shorthand prefix identifier you declared inside your LTI Passport in Step 2). - LTI URL: Paste the specific launch URL copied from your Microsoft tool registration dashboard.
- Scored Options: If this notebook is purely for collaboration, ensure the scoring parameters are turned off. If notebook participation counts towards grades, toggle grading to true and define an assignment category.
- Click Save.
- Click the Publish button in your right-hand status panel to push the unit updates live.
Verification
To confirm the integration is working, open the unit as a learner using View Live or a test learner account. The OneNote notebook should load inside the embedded frame. If it does not appear, verify that:
- The LTI ID in the component settings exactly matches the passport identifier prefix (
onenote) saved in Step 2 - The LTI URL is the correct launch URL copied from your Microsoft registration in Step 1
lti_consumeris present in the Advanced Module List (Step 3)
Student experience in the LMS
Once published, the integration operates smoothly within the course layout player. When an enrolled learner opens the unit page, the LTI consumer initializes a secure iframe communication layer:
- Automatic Creation: The system seamlessly provisions a personal workbook tab for the learner or logs them into the central shared class journal space based on their platform username parameters.
- Inline editing: Learners can type, draw, view lecture slides, or complete group activities directly inside the embedded frame without leaving the LMS.
- Graded submissions: If you enabled scoring in Step 5, the learner's notebook activity is transmitted back to the LMS gradebook automatically via the LTI outcome service. Learners will see their score reflected on the Progress page once grades have been posted.