---
title: How to Add a New Instructor to The Edly Discovery Site?
description: Adding new instructors to your Open edX course can enhance the learning experience by bringing diverse expertise to your content. In this article, we'll walk you through the process of adding a new in
---
[Skip to content](https://help.edly.io/docs/how-to-add-a-new-instructor-on-edly-discovery-site-0#main-content)
English
Show submenu for translations
-1.png?width=100&height=75&name=Edly%20by%20Arbisoft%20(Red%20and%20Gray)-1.png)
Open main navigation
Close main navigation
- English
Show submenu for translations
- Visit edly.io
Visit edly.io
Hello. How can we help you?
- There are no suggestions because the search field is empty.
1. [Edly Knowledge Base](https://help.edly.io/docs?hsLang=en)
2. [Discovery Site](https://help.edly.io/docs/discovery-site?hsLang=en)
3. [Settings and Tools](https://help.edly.io/docs/discovery-site?hsLang=en#settings-and-tools)
# How to Add a New Instructor to The Edly Discovery Site?
### Overview
The **Instructors** portal on your Discovery Site allows you to manage the public-facing profiles, headshots, and biographies of your teaching staff. Registering instructors in a central directory makes it easy to assign them to course runs across your catalog, which helps build credibility and drive student enrollment.
**Tip:** Ensure you have authenticated into your **WordPress Administration Panel (`/wp-admin`)** using an account with Editor or Administrator privileges before proceeding.
### How to Add an Instructor
#### Step 1: Open the Instructor Creation Canvas
1. Log in to your WordPress dashboard workspace.
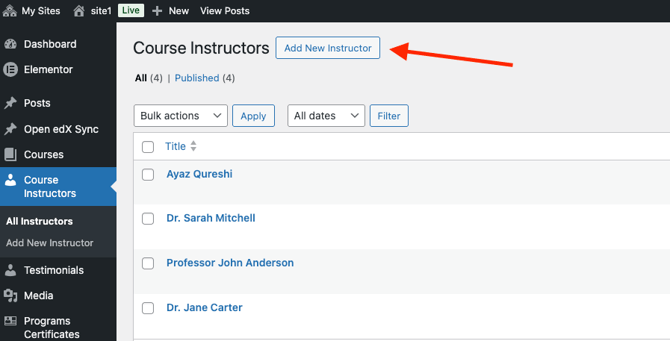
2. From the left-hand navigation sidebar menu, locate and click on the **Instructors** tab.
3. Click the **Add New Instructor** button situated near the top of the index registry page.
> 
#### Step 2: Enter the Instructor's Name, Bio, and Title
A clean, structured text editor workspace will open. Complete the following biographical information fields:
- **Instructor Name (Title Field):** Type the educator's official full name into the primary header field (e.g., *Dr. Sarah Jenkins*).
- **Biographical Description (Main Text Block):** Inside the central paragraph area, write a brief, compelling biography detailing their academic pedigree, professional background, past research achievements, or teaching philosophy.
- **Job Title:** Scroll down to the fields below the editor and enter the instructor's role or title (e.g., *Lead Data Scientist*, *Professor of Economics*, or *Course Author*).
#### Step 3: Attach a High-Resolution Profile Headshot
Adding a consistent, professional photograph increases catalog visual appeal and student enrollment trust.
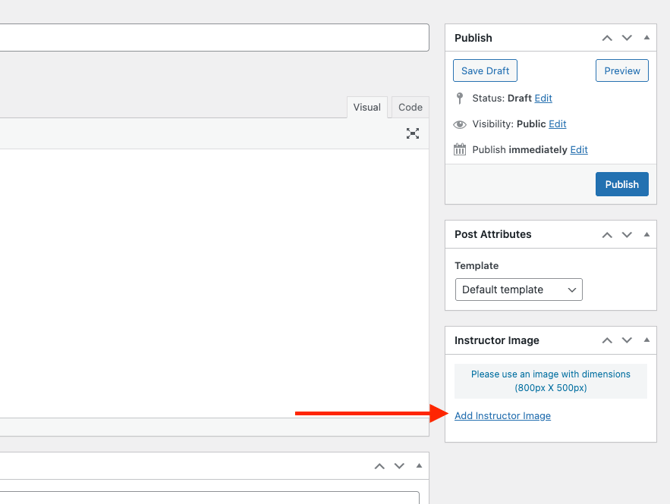
1. Locate the **Instructor Image** configuration module block on the right-hand side of your screen panel.
2. The central Media Library interface opens. You can drag and drop a clean, square portrait orientation thumbnail image from your local computer directly into the upload window, or pick an existing file from your directory rows.
3. **Accessibility Compliance:** Add a descriptive, clear text string inside the **Alt Text** metadata input box on the image options pane (e.g., *Headshot photo of Dr. Sarah Jenkins*). This ensures compliance with web accessibility rules for learners utilizing screen readers.
4. Click **Add Instructor Image** to bind the photo to the instructor profile.
> 
#### Step 4: Finalize and Publish the Profile
1. Review all inputted text entries, title spelling, and photo alignments inside your editing view pane.
2. Click the blue **Publish** button located in the upper-right corner of the workspace.
3. The screen reloads, displaying a successful verification confirmation banner.
The profile is now saved inside the platform system database. You can navigate into your integrated **Courses** page settings block at any time to link this instructor to their corresponding course run page summary cards.
### Managing Existing Instructor Profiles
#### How do I edit an instructor’s background notes?
Navigate from your dashboard sidebar to **Instructors \> All Instructors**. Locate your target educator's row and click on their text name link or click **Edit**. Implement your text or image modifications inside the workspace fields and click the **Update** button to sync changes live instantly.
#### How do I remove a profile from display?
If a staff member transitions off a course line, go to the instructor registry list, hover your mouse cursor over their specific row entry, and click the red **Trash** action link. This moves their profile to a provisional archive storage bin.
*Note: Removing an instructor profile from WordPress cleanly unlinks their bio card from all storefront course display panels without altering any behind-the-scenes grading telemetry or student roster tracking data inside the core LMS.*
- [Discovery Site](https://help.edly.io/docs/discovery-site?hsLang=en#main-content)
- [Settings and Tools](https://help.edly.io/docs/discovery-site?hsLang=en#settings-and-tools)
- [Assets Management](https://help.edly.io/docs/discovery-site?hsLang=en#assets-management)
- [Edly Panel](https://help.edly.io/docs/edly-panel?hsLang=en#main-content)
- [Settings and Tools](https://help.edly.io/docs/edly-panel?hsLang=en#settings-and-tools)
- [User Management](https://help.edly.io/docs/edly-panel?hsLang=en#user-management)
- [Panel Insights](https://help.edly.io/docs/edly-panel?hsLang=en#panel-insights)
- [Panel Dashboard](https://help.edly.io/docs/edly-panel?hsLang=en#panel-dashboard)
- [Themes](https://help.edly.io/docs/edly-panel?hsLang=en#themes)
- [Studio](https://help.edly.io/docs/studio?hsLang=en#main-content)
- [Studio Guides](https://help.edly.io/docs/studio?hsLang=en#studio-guides)
- [Creating a Course](https://help.edly.io/docs/studio?hsLang=en#creating-a-course)
- [Exercises and Tools](https://help.edly.io/docs/studio?hsLang=en#exercises-and-tools)
- [Course Components](https://help.edly.io/docs/studio?hsLang=en#course-components)
- [Course Assets](https://help.edly.io/docs/studio?hsLang=en#course-assets)
- [Re-running Your Course](https://help.edly.io/docs/studio?hsLang=en#re-running-your-course)
- [LMS Administration](https://help.edly.io/docs/lms-administration?hsLang=en#main-content)
- [User Management](https://help.edly.io/docs/lms-administration?hsLang=en#user-management)
- [Open edX E-commerce](https://help.edly.io/docs/lms-administration?hsLang=en#open-edx-e-commerce)
- [Instructor Dashboard](https://help.edly.io/docs/lms-administration?hsLang=en#instructor-dashboard)
- [Learner Experience](https://help.edly.io/docs/learner-experience?hsLang=en#main-content)
- [Learning Management System](https://help.edly.io/docs/learner-experience?hsLang=en#learning-management-system)
- [Discovery Site](https://help.edly.io/docs/learner-experience?hsLang=en#discovery-site)
- [Getting Started](https://help.edly.io/docs/getting-started?hsLang=en#main-content)
- [Open edX E-commerce](https://help.edly.io/docs/getting-started?hsLang=en#open-edx-e-commerce)
- [Learning Management System](https://help.edly.io/docs/getting-started?hsLang=en#learning-management-system)
- [Exercises and Tools](https://help.edly.io/docs/getting-started?hsLang=en#exercises-and-tools)
- [Discovery Site](https://help.edly.io/docs/getting-started?hsLang=en#discovery-site)
- [Edly Panel Management](https://help.edly.io/docs/getting-started?hsLang=en#edly-panel-management)
- [General](https://help.edly.io/docs/general?hsLang=en)
[-2.png?width=34&height=24&name=Edly%20by%20Arbisoft%20(Red%20and%20Gray)-2.png "Chill listening crop-3")](http://arbisoft.com)
[mailto:email@email.com](mailto:email@email.com)
Copyright © 2026, Edly Inc.