---
title: Exporting and Importing Courses
description: Tip: Make sure you have logged in to the Open edX Studio before proceeding with the article. When you have released your course, you can use the course export and import tools in Studio to save a back
---
[Skip to content](https://help.edly.io/docs/exporting-importing-the-course-0#main-content)
English
Show submenu for translations
-1.png?width=100&height=75&name=Edly%20by%20Arbisoft%20(Red%20and%20Gray)-1.png)
Open main navigation
Close main navigation
- English
Show submenu for translations
- Visit edly.io
Visit edly.io
Hello. How can we help you?
- There are no suggestions because the search field is empty.
1. [Edly Knowledge Base](https://help.edly.io/docs?hsLang=en)
2. [Studio](https://help.edly.io/docs/studio?hsLang=en)
3. [Exercises and Tools](https://help.edly.io/docs/studio?hsLang=en#exercises-and-tools)
# Exporting and Importing Courses
## Backup, Duplicate, and Transfer Course Content Between Environments
### Overview
Studio features built-in migration tools that allow you to download a complete backup copy of your course or upload an existing course package. When exporting or importing courses, the platform bundles your data into a compressed package format with a `.tar.gz` file extension.
**Tip:** Ensure you are logged into **Open edX Studio** before proceeding.
**Caution on Internal Links:** Before exporting a course, verify that all internal cross-references to other units utilize the `/jump_to_id/LOCATION_ID` formatting. If you used raw browser addresses instead of jump links, those links will break completely once the course package is imported into a new instance or server domain.
### Part 1: Export a Course
Exporting your course run creates a baseline archive file. This file can be used to store data, manually edit raw XML components, or migrate the curriculum to a separate Open edX platform instance.
#### Data Included in Exports:
- All course structural containers (Sections, Subsections, Units).
- All structural components (HTML text, Videos, Exercises, Problems).
- Custom tabs and navigation pages.
- Course Settings and Grading configurations.
- Static media assets from your **Files & Uploads** directory.
#### Data NOT Included in Exports:
- Student data, roster histories, and student submission grades.
- Course Team profiles and administrative roles.
- Discussion forum posts, comments, or category trees.
- Generated completion certificates.
- Conditional prerequisite subsection lock assignments.
#### Export Procedures:
1. Open your course in **Studio**.
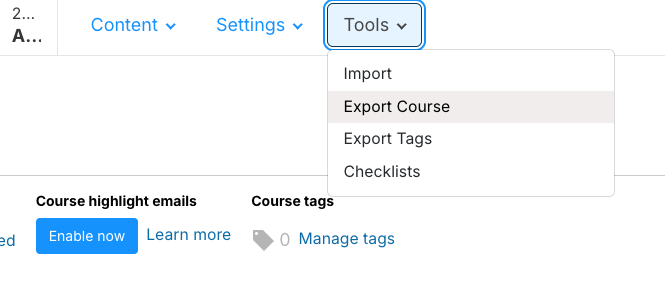
2. Click the **Tools** menu in the top navigation bar and select **Export**.
3. Click the **Export Course Content** button.
4. The system will process your database. Once completed, a download prompt will appear automatically to save the `.tar.gz` package onto your computer.
> 
### Part 2: Import a Course
**Warning:** Executing an import completely overwrites all existing blocks, files, and metadata settings inside your current Studio course shell. This action cannot be undone. Always export and save a local backup copy of your current course before importing a new archive package over it.
#### Package Requirements:
- The import package must be a valid `.tar.gz` compressed archive.
- The internal directory structure must include a central `course.xml` file.
- To avoid formatting errors, verify that all raw components in your package are nested securely inside a parent Unit layout container.
#### Import Procedures:
1. Open your destination course shell in **Studio**.
2. Click the **Tools** menu in the top navigation bar and select **Import**.
3. Click the **Choose a File to Import** button.
4. Locate the correct `.tar.gz` archive on your machine and click **Open**.
5. The platform will run through five verification stages (Uploading, Unpacking, Verifying, Updating, and Completed).
- *Note: You must keep your browser window open during the Uploading and Unpacking stages. Once Unpacking concludes, you can safely navigate away, though it is a recommended practice to wait until the "Completed" status bar turns green before making structural edits.*
**Crucial Step:** When an import completes, milestone calendar parameters—including your Course Start Date, Course End Date, and Enrollment boundaries—are overwritten by the settings inside the imported file. Navigate immediately to **Settings \> Schedule & Details** to verify and correct your operational milestones.
### Directory Terminology Guide
If you extract the exported archive package on your local computer to modify the XML elements directly, use this structural mapping index to locate your content folders:
| **Studio Course Outline Name** | **XML Export Directory Folder Name** |
| --- | --- |
| **Section** | `chapter` |
| **Subsection** | `sequential` |
| **Unit** | `vertical` |
| **Component** | Named by block type (e.g., `html`, `problem`, `video`) |
- [Discovery Site](https://help.edly.io/docs/discovery-site?hsLang=en#main-content)
- [Settings and Tools](https://help.edly.io/docs/discovery-site?hsLang=en#settings-and-tools)
- [Assets Management](https://help.edly.io/docs/discovery-site?hsLang=en#assets-management)
- [Edly Panel](https://help.edly.io/docs/edly-panel?hsLang=en#main-content)
- [Settings and Tools](https://help.edly.io/docs/edly-panel?hsLang=en#settings-and-tools)
- [User Management](https://help.edly.io/docs/edly-panel?hsLang=en#user-management)
- [Panel Insights](https://help.edly.io/docs/edly-panel?hsLang=en#panel-insights)
- [Panel Dashboard](https://help.edly.io/docs/edly-panel?hsLang=en#panel-dashboard)
- [Themes](https://help.edly.io/docs/edly-panel?hsLang=en#themes)
- [Studio](https://help.edly.io/docs/studio?hsLang=en#main-content)
- [Studio Guides](https://help.edly.io/docs/studio?hsLang=en#studio-guides)
- [Creating a Course](https://help.edly.io/docs/studio?hsLang=en#creating-a-course)
- [Exercises and Tools](https://help.edly.io/docs/studio?hsLang=en#exercises-and-tools)
- [Course Components](https://help.edly.io/docs/studio?hsLang=en#course-components)
- [Course Assets](https://help.edly.io/docs/studio?hsLang=en#course-assets)
- [Re-running Your Course](https://help.edly.io/docs/studio?hsLang=en#re-running-your-course)
- [LMS Administration](https://help.edly.io/docs/lms-administration?hsLang=en#main-content)
- [User Management](https://help.edly.io/docs/lms-administration?hsLang=en#user-management)
- [Open edX E-commerce](https://help.edly.io/docs/lms-administration?hsLang=en#open-edx-e-commerce)
- [Instructor Dashboard](https://help.edly.io/docs/lms-administration?hsLang=en#instructor-dashboard)
- [Learner Experience](https://help.edly.io/docs/learner-experience?hsLang=en#main-content)
- [Learning Management System](https://help.edly.io/docs/learner-experience?hsLang=en#learning-management-system)
- [Discovery Site](https://help.edly.io/docs/learner-experience?hsLang=en#discovery-site)
- [Getting Started](https://help.edly.io/docs/getting-started?hsLang=en#main-content)
- [Open edX E-commerce](https://help.edly.io/docs/getting-started?hsLang=en#open-edx-e-commerce)
- [Learning Management System](https://help.edly.io/docs/getting-started?hsLang=en#learning-management-system)
- [Exercises and Tools](https://help.edly.io/docs/getting-started?hsLang=en#exercises-and-tools)
- [Discovery Site](https://help.edly.io/docs/getting-started?hsLang=en#discovery-site)
- [Edly Panel Management](https://help.edly.io/docs/getting-started?hsLang=en#edly-panel-management)
- [General](https://help.edly.io/docs/general?hsLang=en)
[-2.png?width=34&height=24&name=Edly%20by%20Arbisoft%20(Red%20and%20Gray)-2.png "Chill listening crop-3")](http://arbisoft.com)
[mailto:email@email.com](mailto:email@email.com)
Copyright © 2026, Edly Inc.