-1.png?width=100&height=75&name=Edly%20by%20Arbisoft%20(Red%20and%20Gray)-1.png)
Overview
Cerego is an adaptive learning technology platform based on principles of neuroscience and cognitive science. Cerego's patented technology uses the scientific methods of distributed practice and the testing effect as the basis of user memory retention for content built in and available on their website.
Note: make sure you have a paid account in Cerego or BigBlueButton before proceeding with the article.
This guide will let you know the exercise of enabling Cerego Tool into Open edX, but all the steps are same to enable BigBlueButton. Both of these tools are enabled through LTI Consumer XBlock.
Steps to enable Cerego in Open edX
- Create an OAuth app in Cerego.
Note: make sure you have logged in to Open edX Studio before proceeding further.
- Go to Course → Advance Settings and add the Cerego OAuth credentials (this will be obtain from paid accounts) in LTI Passports. This will be the format of LTI Passport and this should be strictly follow.
"id:client_key:client_secret"
-
- ID is a value that you create to refer to the remote LTI tool provider. You should create an LTI ID that you can remember easily. i.e. BigBlueButton, CeregoTool, Zoom.
- Client Key is a sequence of characters that you obtain from the LTI tool provider. The client key is used for authentication and can contain any number of characters. For example, your client key might be b289378-f88d-2929-ctools.school.edu.
- Client Secret is a sequence of characters that you obtain from the LTI tool provider. The client secret is used for authentication and can contain any number of characters. For example, your client secret can be something as simple as secret, or it might be a string of numbers and letters such as 23746387264 or yt4984yr8.
To create an LTI passport, combine the LTI ID, client key, and client secret in the following format (be sure to include the colons).
{your_lti_id}:{client_key}:{client_secret}
- Go to Settings → Advance Settings and add string "lti_consumer" in the Advanced Module List. You can now add this problem type in a unit by clicking on the Advanced component (this components are displayed within a unit when you add it.)
Note: When you enter strings as policy values, ensure that you use double quotation marks (") around the string. Do not use single quotation marks (').
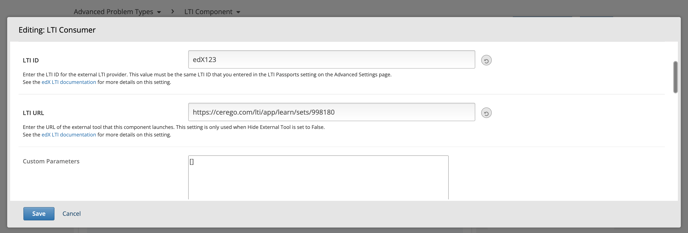
- Add the LTI Consumer problem in a unit where you want it and fill the form.
- add LTI ID that you set in LTI Passport field.
- add LTI URL of the remote LTI tool that this component launches.
- Sends additional Custom Parameters that are required by the remote LTI tool. The parameters that you send depend on the specific LTI tool you are using.
Supply a key and value for each custom parameter. The key is an identifier for the parameter. Use the following format.
{key}={value}For example, an LTI tool that displays an e-book might accept a page parameter to control which page the e-book opens to by default. The following example sends a page parameter to an LTI tool.
["page=144"]
- Save changes and Publish the unit.
- Great! Your integrated external tool is live on LMS.